Winlink Basics
Prepared for Stow and Marlborough ARES by Carl Howe, WG1V, wg1v@carlhowe.com
Saturday, May 6, 2023
Introduction
How many of you use email? Probably everyone. But how many of you used email back in the days of AOL, Compuserve, and UUNET? For those of you who answered yes to that question, you’re going to love Winlink. Winlink brings us back to those halcyon days of yesteryear.
Why? Because Winlink is just a simple, BBS-based email system (see Figure 1 below). The main difference between Winlink and the email systems you know and love today is that Winlink email is optimized to work with low-bandwidth radio connections.
Now for those of you who don’t remember the dulcet tones of 1200 baud modems providing email services, here’s how operating Winlink is different from how we use internet email today. With Winlink, we typically:
Create and read emails offline. All Winlink viewing and composition is done in a Winlink client on a local PC. The best known of these clients is Winlink RMS Express, but others such as pat and Airmail are also commonly used.
Connect to a server to send or receive emails. No email gets sent or received until we make a connection to a Winlink server, either by radio or the internet.
Select from several possible connection modems. Winlink emails can be sent through the internet, HF modems, VHF modems, or packet systems. All of these other the internet have fairly low bandwidth capabilities.
Limit our messages to the essentials. Because radio links are slow (typical HF transmission rates are between 300 and 1200 bits per second or so), we want to send only the minimum amount of information, usually in pure text form without embellishment. This means that we don’t send pretty form images or attachments other than in exceptional circumstances.
While Winlink is optimized for radio transmission, Winlink servers still have the ability to use the internet when it’s available to synchronize messages among servers. They also have the ability to convert radio messages into internet emails and vice versa, with some restrictions required for regulatory reasons.
As noted above, several different Winlink clients exist, but the most commonly used is Winlink CMS Express, which is a piece of software distributed through winlink.org. Throughout this document, I’ve provided directions for Winlink CMS Express and typically will refer to it simply as Winlink or Winlink Express. When I refer to the Winlink network or servers, I’ll try to be explicitly say Winlink network and Winlink servers.
I don’t however, want anyone to think that you can’t participate in the Winlink network if you don’t run Winlink Express or the Windows operating system. For notes on why one might want to make a different choice and what might work on other platforms, see the section at the end of this document titled Personal Notes and Observations.
Requirements
Before you can start with Winlink, you need to do some work on <winlink.org>. You’ll need to:
Download the Winlink CMS Express software. You’ll need a Winlink software client before you can do anything with the Winlink network, and as noted previously, Winlink CMS Express is the client most commonly used. You can download it from https://downloads.winlink.org/User%20Programs/
Register your callsign and password. You must register your callsign and a password with winlink.org before you can use their servers. This is typically done by entering your callsign and password into Winlink Express’s Settings and making a telnet connection to winlink.org to register those credentials. For the Stow (and Marlborough?) site, the site callsign and password have already been registered and programmed into Winlink CMS Express at their emergency operations sites.
Whitelist any internet addresses you wish to accept traffic from. Because the Winlink radio network requires a licensed amateur operator to be responsible for all traffic, your account must “bless” internet addresses that you authorize to send email to the network. Typically, these addresses will be ones like your home email address and the addresses of members of your ARES organization and emergency personnel. You whitelist email addresses by logging into winlink.org, providing your authorized account credentials on the My Account page, and then following the directions on My Whitelist.
The Winlink Workflow
Communicating using Winlink is a three step process:
Create messages in Winlink offline and post them to your Outbox. When you have traffic to send, you can create simple text messages or structured messages using predefined forms such as the FEMA form ICS-213 directly within the Winlink program.
Connect to a server to send and receive messages. You can connect to any Winlink server to upload and download you messages. Winlink will offer you a set of servers to choose from based on what modem type you select (internet, ARDOP, VARA, PACTOR, packet, and so forth).
Read and manage your incoming messages. Because Winlink only sends the contents of forms and not the form itself, you’ll have the best experience viewing Winlink messages from your Winlink client itself.
We’ll walk through each of these steps separately because each step uses different screens in the interface.
1. Create and Post a Message
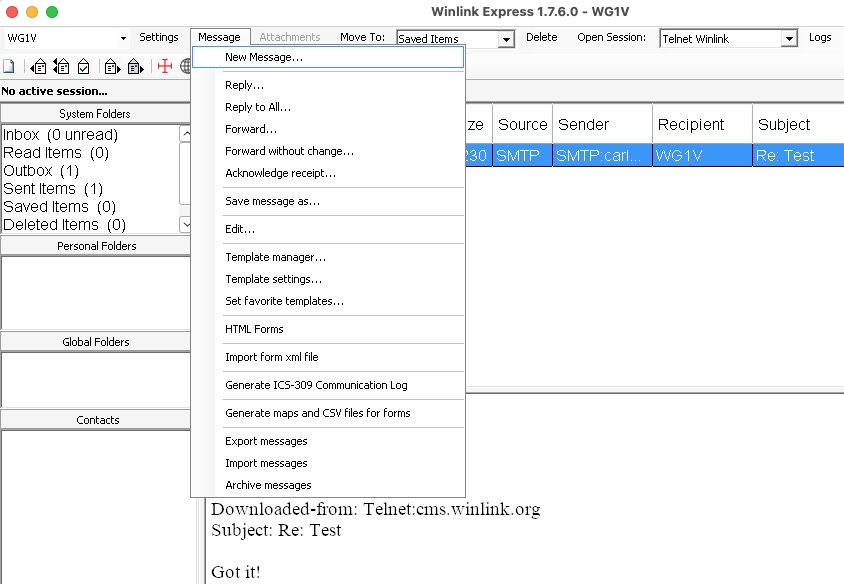
Creating a message is simple: You select New Message from the top menu of Winlink as shown in Figure 2:
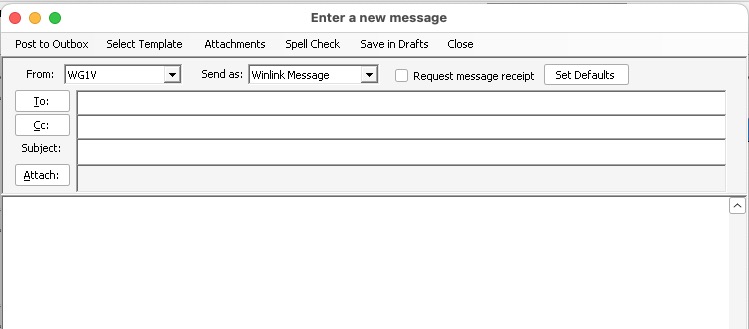
Your click on New Message will open a window that looks like Figure 3:
Fill in the callsigns of other Winlink users you want to send your message to in the To: and Cc: fields. Callsigns are terminated by semicolons; if you don’t type one, Winlink will insert it for you. You can also add internet addresses in standard internet email notation as shown in Figure 4 below.
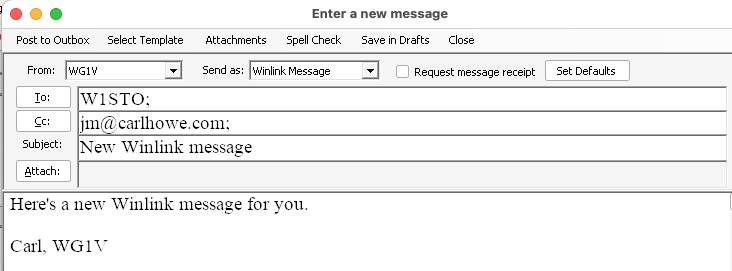
When you have finished composing your message, click Post to Outbox in the top left corner of the window, and Winlink will return you to the home page. You can post as many new messages as you like before connecting to Winlink servers.
1.1 Create and Post an ICS-213 Form Message
When operating as part of an emergency exercise or operation, you’ll often want to send and receive FEMA or ARRL standard forms instead of ordinary text messages.
Creating and posting an ICS-213 form or ARRL Radiogram only requires a couple of extra steps. I’ll illustrate the process using the ICS-213 form, but the ARRL Radiogram form works the same way.
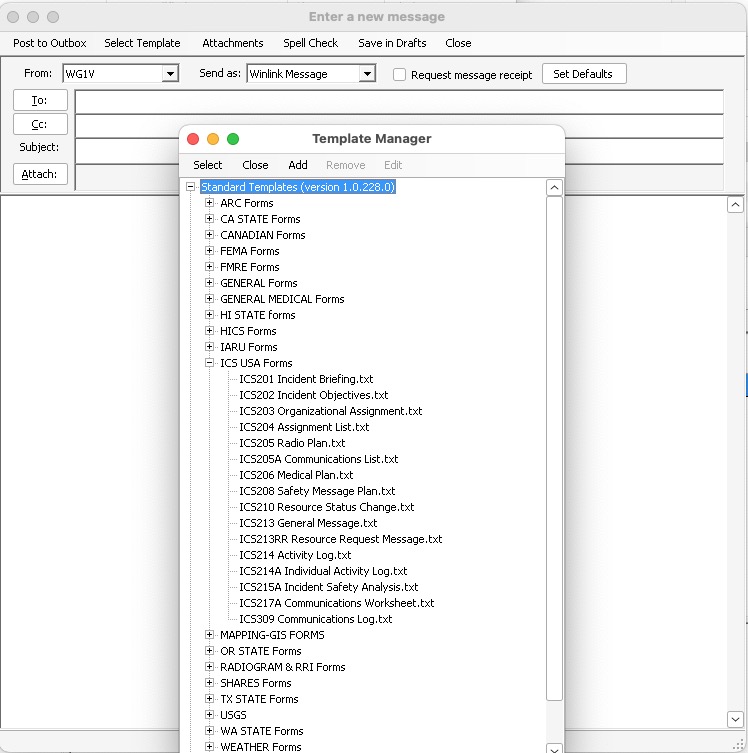
After you have clicked New Message from the top menu of Winlink, you click on Select Template from the menu bar of the new window created. That click brings up a long list of possible message templates to choose from. Select the ICS213 General Message.txt template that appears under Standard Templates > ICS USA Forms list as shown in Figure 5:
Your click on the ICS213 template will open the form in your computer’s web browser and provide fields into which you can type. Figure 6 shows such a form with the fields filled in.

Once you’ve filled in the text fields you wish sent, click on the Submit button outlined in green at the bottom of the window. The browser window will then close, and you’ll be returned to the standard text message window as shown in Figure 7.
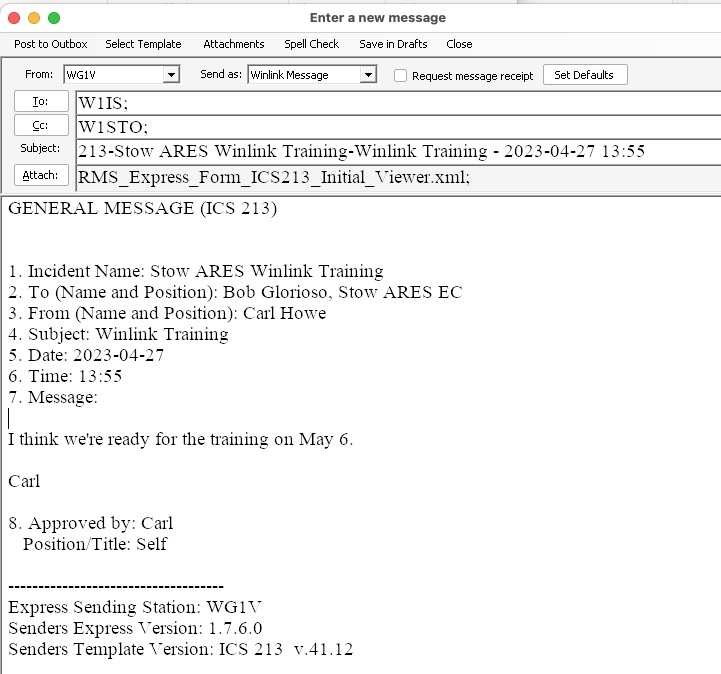
Note that Winlink only sends the text of the form fields, instead of sending the entire form. This preserves scarce radio bandwidth when sending the message.
To queue up the ICS213 message for transmission, click on Post to Outbox in the message window. You’ll then be returned to the Winlink home screen.
2. Connect to a Server
To actually send and receive messages, we must connect to a Winlink server for email transfer. To do this, we need to:
Select a communications protocol or modem. Winlink can send and receive messages using a wide variety of communications methods, including internet, ARDOP, packet, VARA, PACTOR, and a host of others. You select your communications method based on what capabilities are available to you at your Winlink station.
Choose a server that uses that protocol or modem. Once you’ve selected a communications method, Winlink will provide you with a list of servers to choose from that support that method.
In this document, I’ll focus on three communications methods: Telnet (via the internet), VARA, and ARDOP. You can use the internet method any time you have an internet connection, while VARA and ARDOP are used for HF radio connections.
2.1 Using Telnet over the Internet
Assuming your computer has in internet connection, connecting via the internet is the easiest way to send and receive email. You connect using Telnet by selecting Telnet Winlink from the pull down menu next to the Open Session menu item, and clicking Open Session as shown in Figure 8.

When you click on Open Session, Winlink will open a new window titled Telnet Winlink Session as shown below in Figure 9.
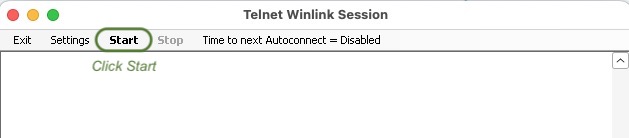
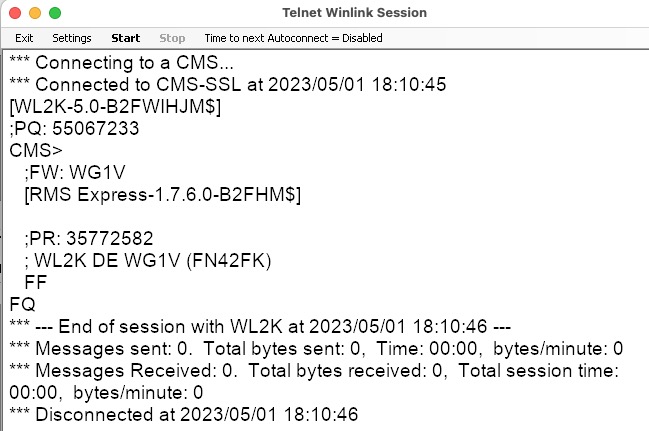
Click Start to send and receive emails. The session should soon send all the emails in your Outbox and fetch any emails addressed to you as shown below in Figure 10.
2.2 Using Radio Modems
While the internet is a fast and easy way to connect to Winlink servers, we also want the ability to connect to servers using radio in case of emergencies when the internet may not be available. Winlink includes several modem types for use with radios to provide over-the-air connections.
Connecting to Winlink servers using radio modems has two major differences with connecting over the internet. A radio modem requires:
A connection to the audio ports of the radio.
A control port to control transmission, push-to-talk, frequency, and mode.
Modern HF transceivers such as the Icom IC-7300 typically combine these two functions onto a single USB connection to your computer. That said, the two connections to the radio are typically configured separately as a USB audio port and a USB serial port.
At both the Marlborough and Stow emergency sites, the radio modems should already be configured for use with the modems typically used. Should users need to change those configurations, be aware that you set the radio and audio settings from the modem session windows that pop up when you select the modem, not from the Winlink home page.
2.3 VARA Modem Connections
The VARA modem is a high-performance weak signal modem made by EA5HVK based on Orthogonal Frequency Division Multiplexing technology (OFDM). Despite its commercial business model, it has rapidly become one of the most popular HF connection modes because of its relatively high speed and ability to adapt to a wide variety of radio propagation conditions. Users who don’t wish to pay the commercial licensing fee can still use VARA modems, but the free version limits the transmission speeds significantly.
The Stow installation at the Stow Fire Station has a paid version of the VARA modem installed and configured for its Icom IC-7300 rig. I’m unsure of whether the version in Marlborough has been similarly configured, but Winlink will work with whichever version is installed.
You make a connection to a Winlink server using VARA in 3 steps:
Launching the VARA session. This starts up the VARA executable that will handle the transmission.
Choosing a server. The VARA program allows you to select from a list of servers or from a map.
Starting transmission. Once you’ve chosen a server, you click Start and VARA attempts to connect to the server and send and receive all emails pending.
I’ll walk through each step separately.
2.3.1 Launching a VARA Session
You launch a VARA session by selecting VARA HF Winlink from the pull down menu next to the Open Session menu item, and clicking Open Session as shown in Figure 11.

Doing this will pop up 1 or 2 new windows:
A new VARA session window (see Figure 12). This window contains the settings dialog for the radio and the menu selections needed to select a server and start a session.
If your installation has been configured for to display it, a VARA user interface window (see Figure 13). This window allows you to set the audio inputs and levels and monitor the data transmission in real time. If this window doesn’t appear automatically, you can make it visible by clicking on the VARA icon in the Windows window tray.
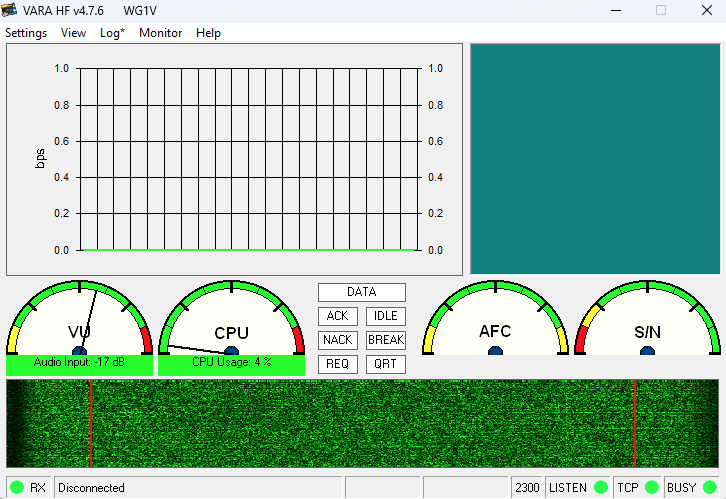
Assuming the radio is properly configured, you should see noise and/or signals on the waterfall and gauges.
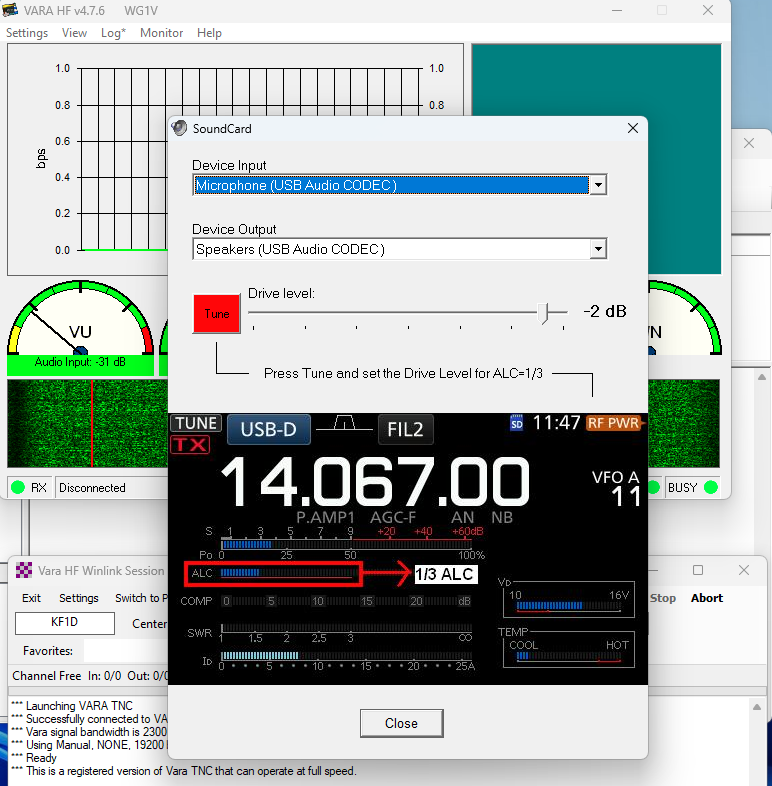
If you do not see any signals, you may need to adjust the audio inputs and levels by selecting Settings > Soundcard in the VARA UI window. For the Icom IC-7300 USB connection, you’ll typically have the audio input set to USB Audio as shown in Figure 14. If your audio input isn’t set to USB Audio CODEC, select it using the pull down menus.
2.3.2 Selecting a Server
The process of selecting a server connection brings up an important question: Which server should I choose?
In most cases, You should choose whatever server you believe will provide the best connection.
You can choose any server you want because Winlink servers routinely synchronize their email databases using the internet. That means that you should be able to send and receive your emails with any server you decide to connect to, and the Winlink network will handle getting your messages to their ultimate destinations.
This set of internet backbone connections brings up an important secondary consideration. In the case of an actual emergency where the internet is not available locally, you should choose a server that is outside the area of internet disruption. So if a major flood and power outage were to black out all of New England, our goal should be to connect to servers outside of New England to carry our emergency traffic.
The VARA session window allows you to type in your own server call signs and frequencies or to select them from a list or map. Most operators prefer to choose one from a list. Click on the menu item Channel Selection to choose a server from its list. Clicking on Channel Selection will bring up a window that looks like Figure 15.

The server list will provide you with call signs, frequencies, grid squares, and path quality estimates for nearby servers you can connect to. Double-click on the one that you wish to connect to and you’ll be returned to the VARA session window.
PLEASE NOTE: In the process of displaying this window, Winlink may ask if you wish to refresh the server list and path quality estimates. If you are in the middle of an emergency or exercise, YOU DO NOT WANT TO DO THIS. Updating these figures will both require a significant amount of internet or radio bandwidth, and you will be unable to do anything until it completes.
Should you wish to select your server based on geography, clicking on Map in the VARA session window will allow you to do so as shown in Figure 16.
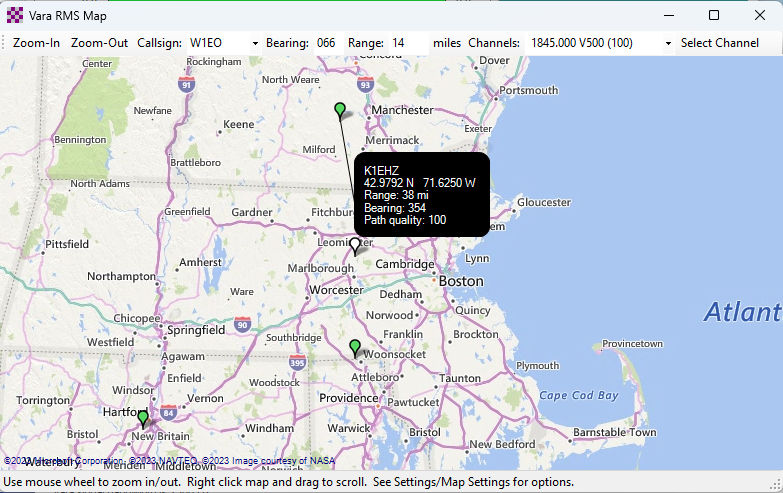
While both of these approaches give you many options when getting used to Winlink, you’ll typically have a list of favorite servers to connect to in the Favorites list of the session window.
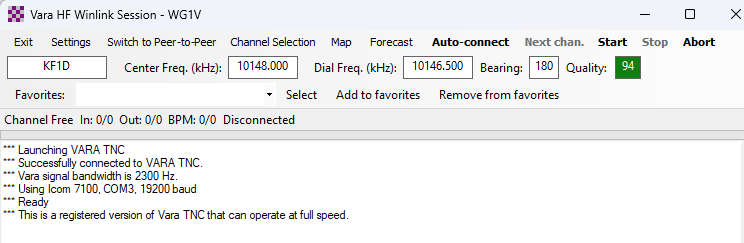
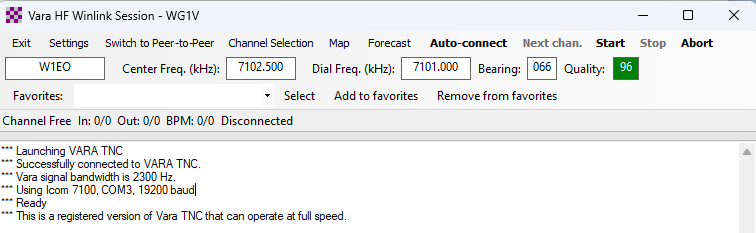
Once we select a server, the callsign and frequency will be shown in the session window as shown in Figure 17. In this case, we’ve selected W1EO as our server which is just 14 miles away at a bearing of 66 degrees, and its path quality is predicted to be 96 out of 100.
2.3.3 Starting transmission.
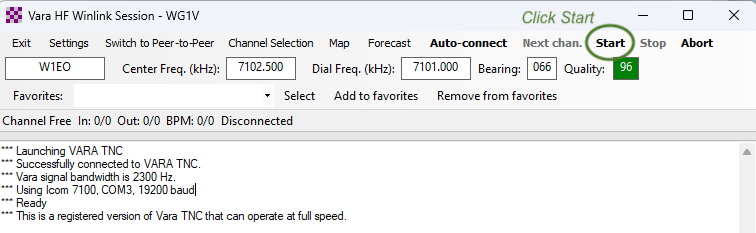
Click Start in the VARA session window to contact the server you selected as shown in Figure 18.
Assuming everything is set up correctly, the transmitter should begin transmitting connection requests to the server about every couple seconds or so. It will typically take the server 5 to 10 requests to answer (and sometimes more), so be patient. You may have to request a connection more than once if the server or the radio channel is busy.
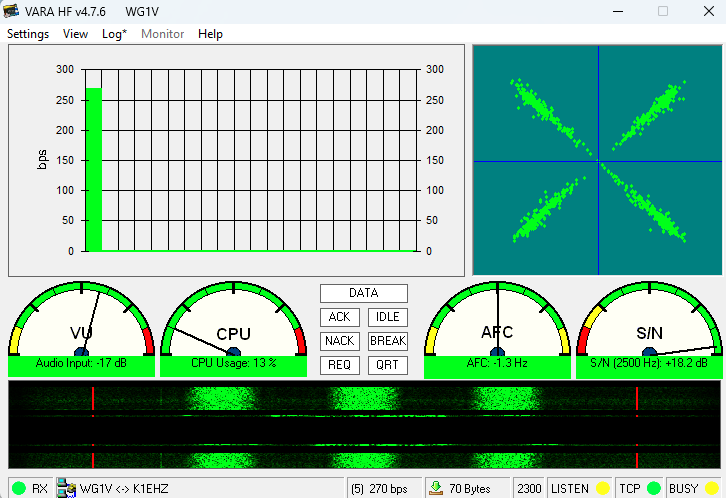
When a connection gets made, the VARA UI window will begin displaying performance information about the connection as shown in Figure 19. The connection shown is receiving data at about 270bps, which is fairly throughput on 2.3 KHz SSB channels. Good channel conditions can cause VARA to “upshift” to faster speeds using more subcarriers, but that’s only likely to happen when you have a large number of messages or large data attachments being sent.
Once all the queued messages have been sent and received, VARA will stop transmitting and return you to the session window. You can then close that window by clicking the X at the top right of the window and go back to the Winlink home window.
2.4 ARDOP Modem Connections
ARDOP is a free and open source radio modem standard supported by Winlink. Some operators feel uncomfortable using commercial software such as VARA in amateur operations, so they will often use ARDOP instead. Many servers are can make connections using either VARA or ARDOP, so which you choose is strictly a personal choice.
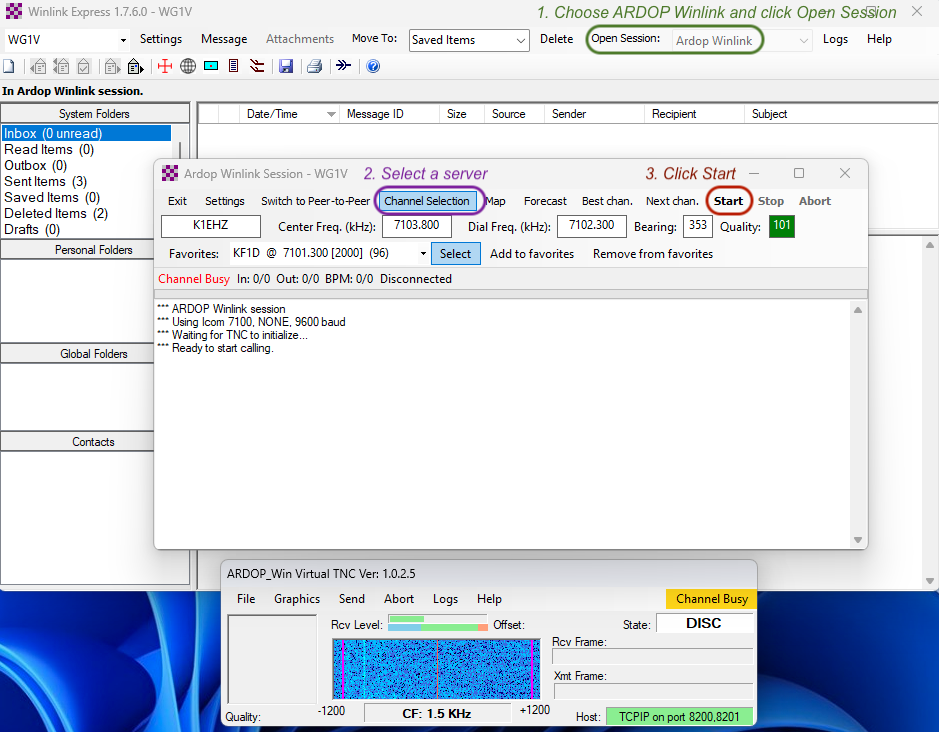
You run an ARDOP session the same way you do a VARA one, as shown in Figure 20:
Choose ARDOP Winlink from the session pull down menu and click Open Session.The ARDOP session window (and optionally a UI window) will then appear.
Select a server to contact by clicking on Channel Selection. Once again, you can use the server list or map to choose your server. Double click on what server you choose to populate the session window.
Start the session by clicking on Start in the session window. The transmitter should then start keying and polling the server.
 ARDOP is not as fast as VARA so it will take longer to send and receive your messages than it would with VARA.
3. Reading and Managing Messages
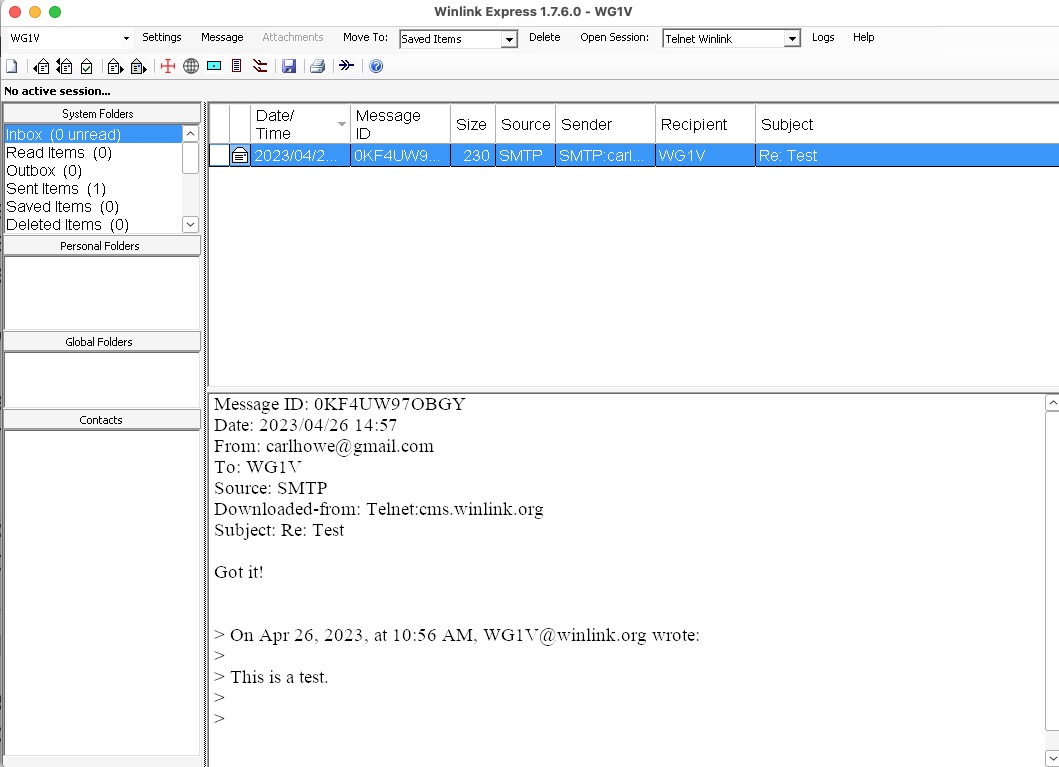
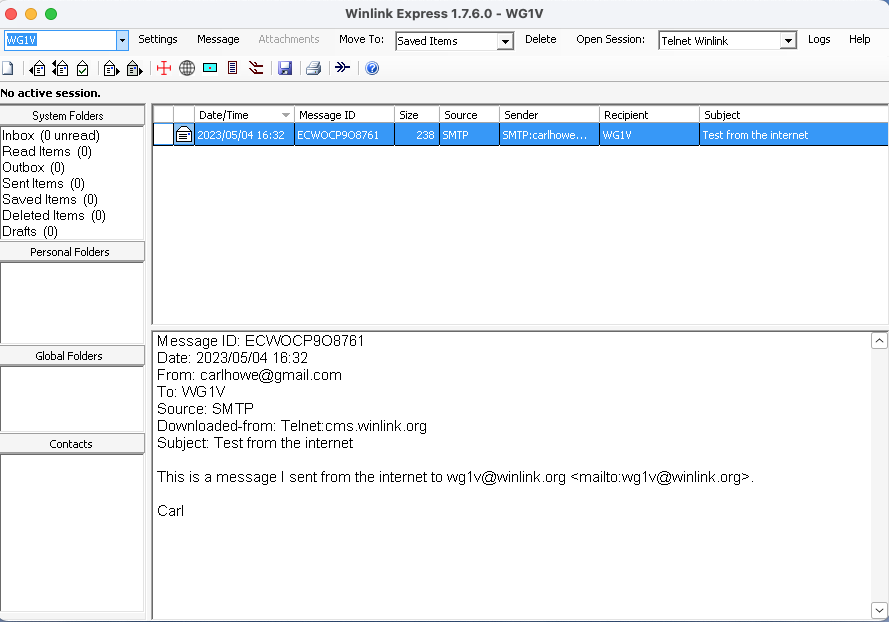
Regardless of how you connected to the Winlink servers, messages addressed to your callsign will show up in your Winlink Inbox. Figure 21 shows what an ordinary text message from the Internet looks like when it arrives in Winlink.
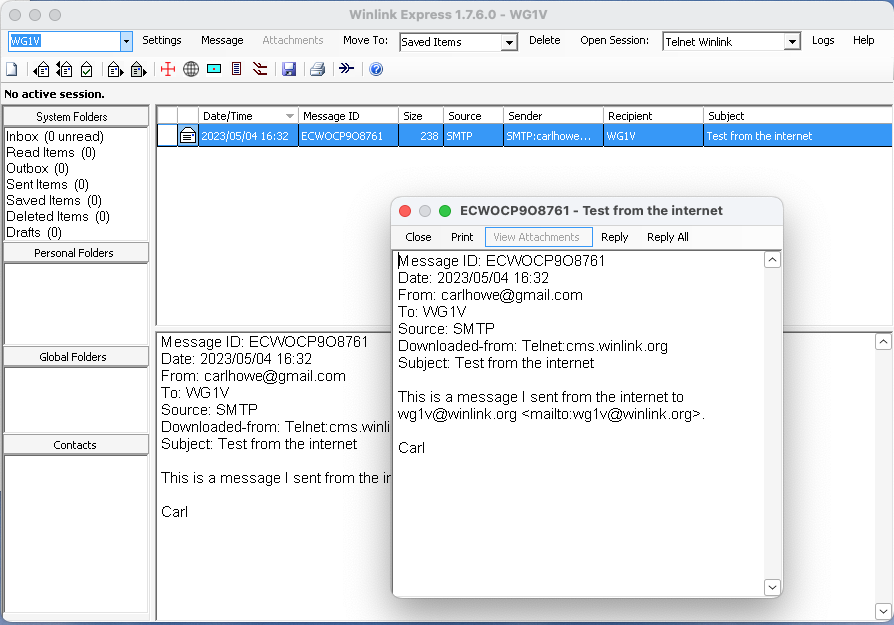
Double-clicking on the highlighted message in your Inbox will display the message in its own window as shown in Figure 22.
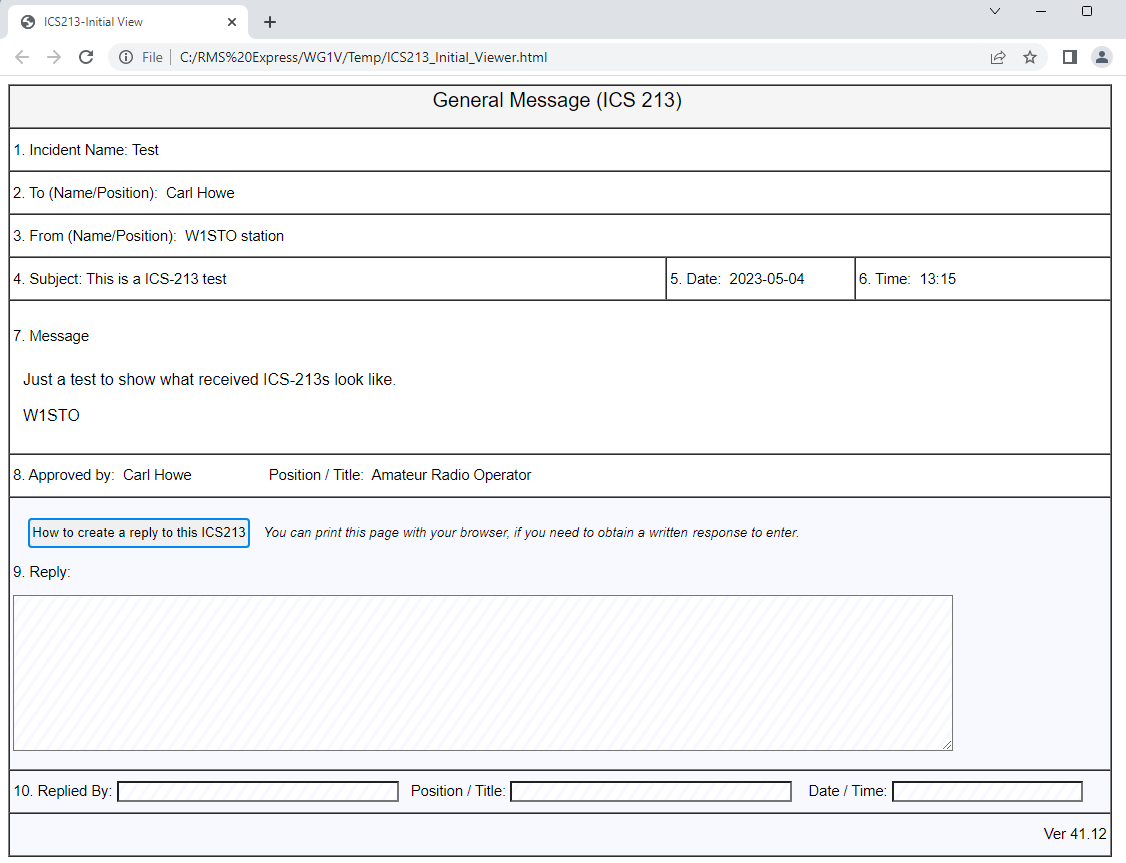
But what about formatted messages like an ICS-213? Double-clicking on an ICS-213 message header will cause it to open up in your the web browser as shown in Figure 23. You can then print the formatted form should you so desire.
One cautionary note regarding ICS-213 messages: Because ICS-213 messages are formal communications passed as part of an emergency, you probably don’t want to delete them once you’ve read them. Here’s how to save them instead.
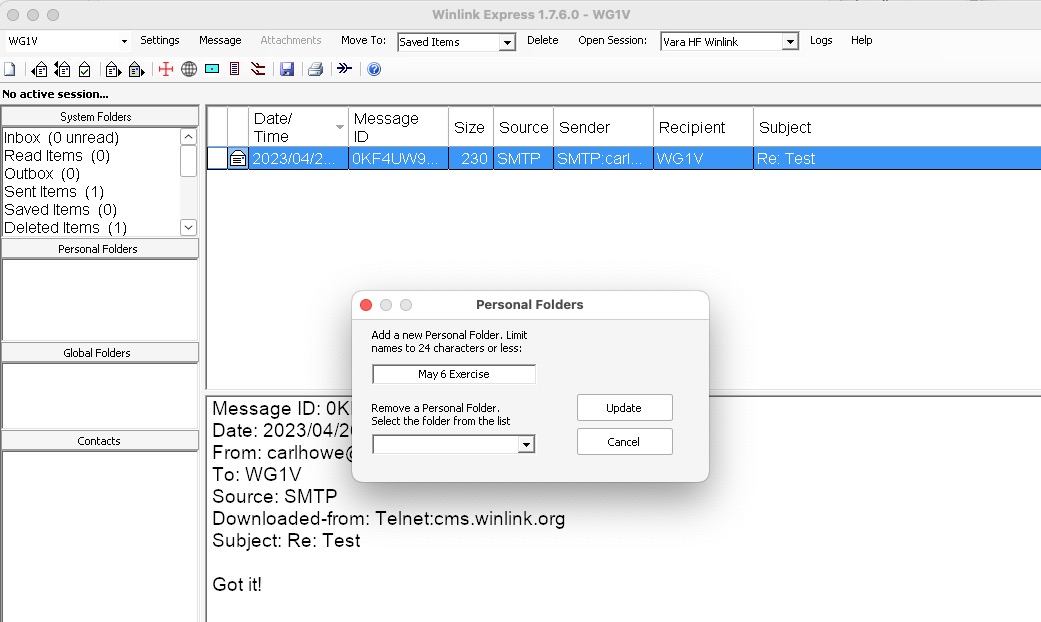
First, create a new folder in which to store the message by right-clicking in the Personal Folders pane of the Winlink home window. That will bring up a dialog box into which you can type the name of your new folder as shown in Figure 24.
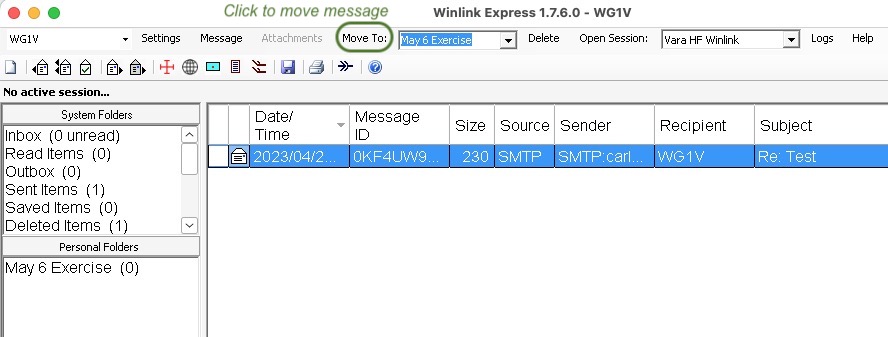
Once you’ve created your destination folder, you can move highlighted messages in your Inbox to it by selecting the folder in the menu bar and clicking Move To as shown in Figure 25.
Summary
At the end of the day, Winlink is just an offline email client that talks to internet servers using radio. You work with it pretty much the same way you’d work with Apple Mail or Microsoft Outlook with a few exceptions:
We create emails offline and post them to an Outbox. Unlike on your internet-connected PC, creating a message is done separately from sending it to its destination.
We explicitly choose how to connect to a server to send or receive emails. We can send and receive emails using the telnet protocol if we have internet connectivity or VARA and ARDOP if we use a HF radio instead.
We limit our messages to the essentials. Because radio links are slow (typical HF transmission rates are between 300 and 1200 bits per second or so), we don’t send big attachments or forms. Instead, we focus on the text contents that fill in forms and templates.
The Winlink network allows you to practice using Winlink from your own PC with telnet once you are registered. Once you have the basics of sending and receiving message down (especially those using templates), sending messages during an emergency communications exercise will be more familiar and less error-prone.
Personal Notes and Observations
I created this document to assist fellow hams in the Stow and Marlborough ARES groups in getting up to speed with Winlink for emergency operations. However, I’m not an expert in Winlink, and this document may contain serious errors. Use this document as a starting point for your own experiments and not as an authoritative reference.
Personally, while I acknowledge the utility of Winlink because it has become a de facto standard in the amateur emergency community, I find the Winlink CMS Express program itself quite problematic. Why? Well, because it is:
Windows-only. While Windows may have dominated the computer space back in the last century, Windows PCs are now a small fraction of the computing devices used by today’s generation brought up on smartphones, tablets, and Chromebooks. The vast majority of communiations devices today run some variant of Unix or Unix-like OSes and most widely-used networks use software that is available across multiple platforms including Macs, Linux, and a host of other systems. The very name Winlink implies only Windows users are welcome, to the exclusion of today’s broader computing community.
Monolithic software. Winlink express tries to do everything from reading email to managing radios in one monolithic program. Software engineering over the past 50 years has taught us that such monolithic systems are difficult to extend as environments change and near impossible to maintain in long term.
Doesn’t play well with others. Modern ham shacks nowadays have many pieces of software running to manage radios, antennas, and tuners, yet Winlink Express insists on having a direct control of any radio it uses. Other Winlink clients such as pat have the ability to interface with rig control software such as flrig and rigctld over the network, while Winlink Express demands exclusive use of the radio via its serial connection. It’s a design rooted in the past, not in present best practice.
Predominantly using a commercial Windows-only modem. While ARDOP is still supported by Winlink Express, most HF Winlink transmission is done nowadays using VARA, which is commercial software written and supported by one person and only has one, Windows-only implementation. Not only does this put the network dependent on a single individual for critical communication, but it also inhibits the evolution of the network by developers other than the VARA author.
Astute readers will have noticed prior to this point that the screen shots shown here are often shown inside Apple Mac windows, which would appear to contradict the claim that Winlink Express doesn’t work on other platforms. Those screenshots were done using a Windows emulation environment called Crossover. However, while that environment was adequate for capturing screenshots, I’ve not been able to get Winlink Express to actually control a radio using either environment. Therefore, it’s not yet a solution to the Windows-only software issue.
Should anyone be interested in my working Mac configuration for Winlink, I participate in the network using the pat Winlink client which is available for Mac, Windows, and Linux. I run pat on my Mac, along with rigctld and flrig as rig control daemons, both of which have native Mac versions. Those same daemons are used by fldigi, WSJT-X, and Rumlog, which all run simultaneously in my shack without stepping on one another. Because VARA is Windows-only, I run that in a Parallels virtual Windows machine for VARA connections. I do the same with ARDOP, although my son and I have been working to reverse engineer ARDOP to run on the Mac based on the Linux ARDOP implementation. While this may seem more complicated than Winlink Express, it allows all the components to evolve at their own paces and works with a wider variety of hardware configurations.